Week 14: Interface and Application Programming
Link to our group assignment
➡️ Step 1 : Develop a GUI or web app using HTML and Firebase.
➡️ Step 2 : Implement JavaScript for Web Serial APIs.
➡️ Step 3 : Program the board to receive data from the Web Serial API.
➡️ Step 4 : Test and debug the code.
Simple Web interface to display photodiode readings using ESP8266 Wroom 02D:
To display light readings from a photodiode connected to the A0 pin of an ESP8266 Wroom 02 D on a web UI, follow these step-by-step instructions:
Materials Needed:
- ESP8266 Wroom 02 D
- Photodiode
- Resistor (appropriate value to form a voltage divider with the photodiode)
- Breadboard and jumper wires
- USB cable to program the ESP8266
- Computer with Arduino IDE installed.
Step 1: Setting Up the Hardware
-
Connect the Photodiode:
- Connect the anode of the photodiode to 3.3V.
- Connect the cathode of the photodiode to one end of the resistor.
- Connect the other end of the resistor to GND.
- Connect the junction between the photodiode and the resistor to the A0 pin of the ESP8266.
-
Connect the ESP8266 to Your Computer:
- Use the USB cable to connect the ESP8266 to your computer for programming.
Step 2: Install the ESP8266 Board Package in Arduino IDE
- Open the Arduino IDE.
-
Go to
File > Preferences.
-
In the "Additional Board Manager URLs" field, add the following URL:
http://arduino.esp8266.com/stable/package_esp8266com_index.json.
-
Go to
Tools > Board > Board Manager.
-
Search for
ESP8266and install the latest version.
To extend the previous code to include converting the analog value from the photodiode to a percentage and displaying it on a web interface hosted by the ESP8266, you can follow this approach. We'll use the ESP8266WebServer library to create a simple web server that shows the percentage value:
#include <ESP8266WiFi.h>
#include <ESP8266WebServer.h>

const char* ssid = "Vinci";
const char* password = "Vinci2017!";

const int analogPin = A0;
const int maxAnalogValue = 1023; // Maximum value from ADC (10-bit resolution)
const int referenceVoltage = 3.3; // Reference voltage for ADC

ESP8266WebServer server(80);

void setup() {
  Serial.begin(115200);
  delay(100);

  // Connect to Wi-Fi
  Serial.println();
  Serial.print("Connecting to ");
  Serial.println(ssid);
  WiFi.begin(ssid, password);
  while (WiFi.status() != WL_CONNECTED) {
    delay(500);
    Serial.print(".");
  }
  Serial.println("");
  Serial.println("WiFi connected");

  // Print the IP address
  Serial.println(WiFi.localIP());

  // Setup web server routes
  server.on("/", handleRoot);

  // Start web server
  server.begin();
  Serial.println("HTTP server started");
}

void loop() {
  // Handle client requests
  server.handleClient();

  // Read analog value from photodiode
  int sensorValue = analogRead(analogPin);

  // Convert analog value to percentage
  float percentage = (sensorValue / float(maxAnalogValue)) * 100.0;

  // Print the sensor value and percentage to serial monitor
  Serial.print("Sensor value: ");
  Serial.print(sensorValue);
  Serial.print(", Percentage: ");
  Serial.println(percentage);

  // Wait for a second
  delay(1000);
}

void handleRoot() {
  // Create HTML page with the percentage value
  String html = "<html><body>";
  html += "<h1>Photodiode Reading</h1>";
  html += "<p>Percentage: ";
  html += getPercentage();
  html += "%</p>";
  html += "</body></html>";

  // Send HTML response to client
  server.send(200, "text/html", html);
}

String getPercentage() {
  // Read analog value from photodiode
  int sensorValue = analogRead(analogPin);

  // Convert analog value to percentage
  float percentage = (sensorValue / float(maxAnalogValue)) * 100.0;

  // Format percentage as string
  return String(percentage, 2); // Round to 2 decimal places
}
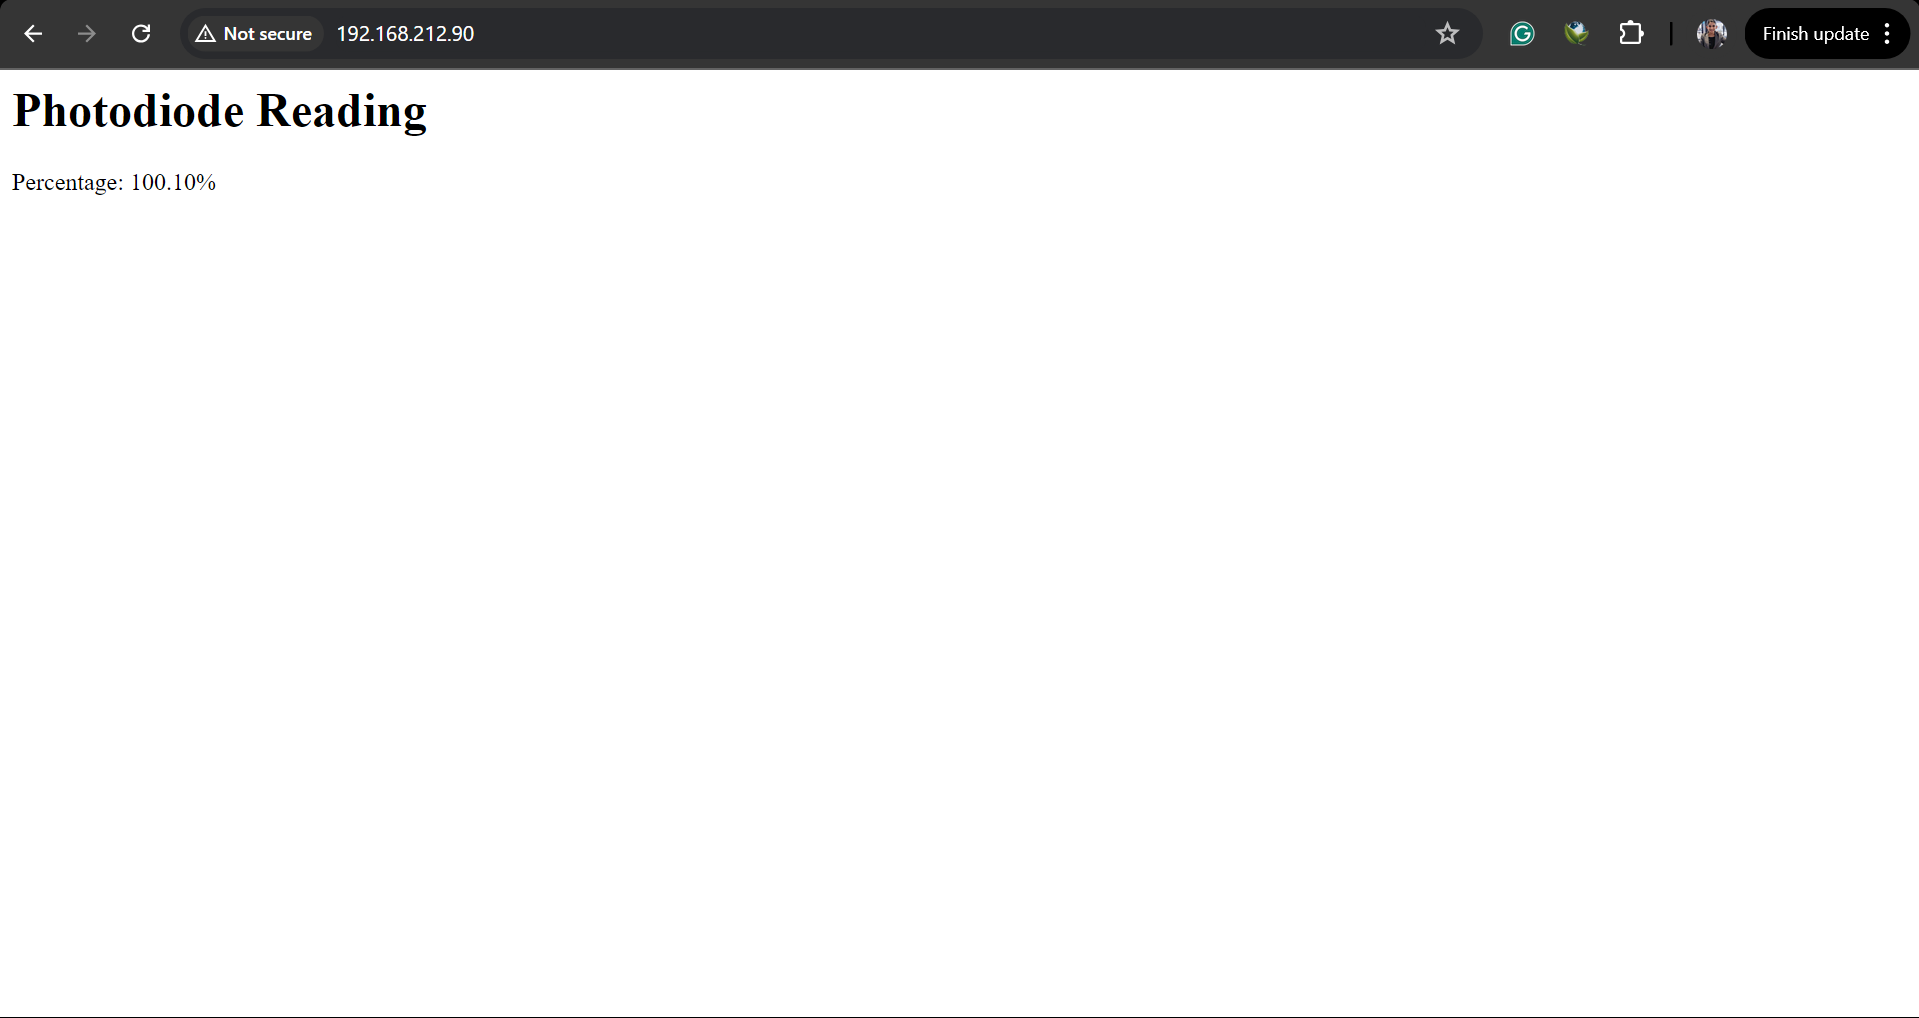
- After opening the serial monitor, i got this message
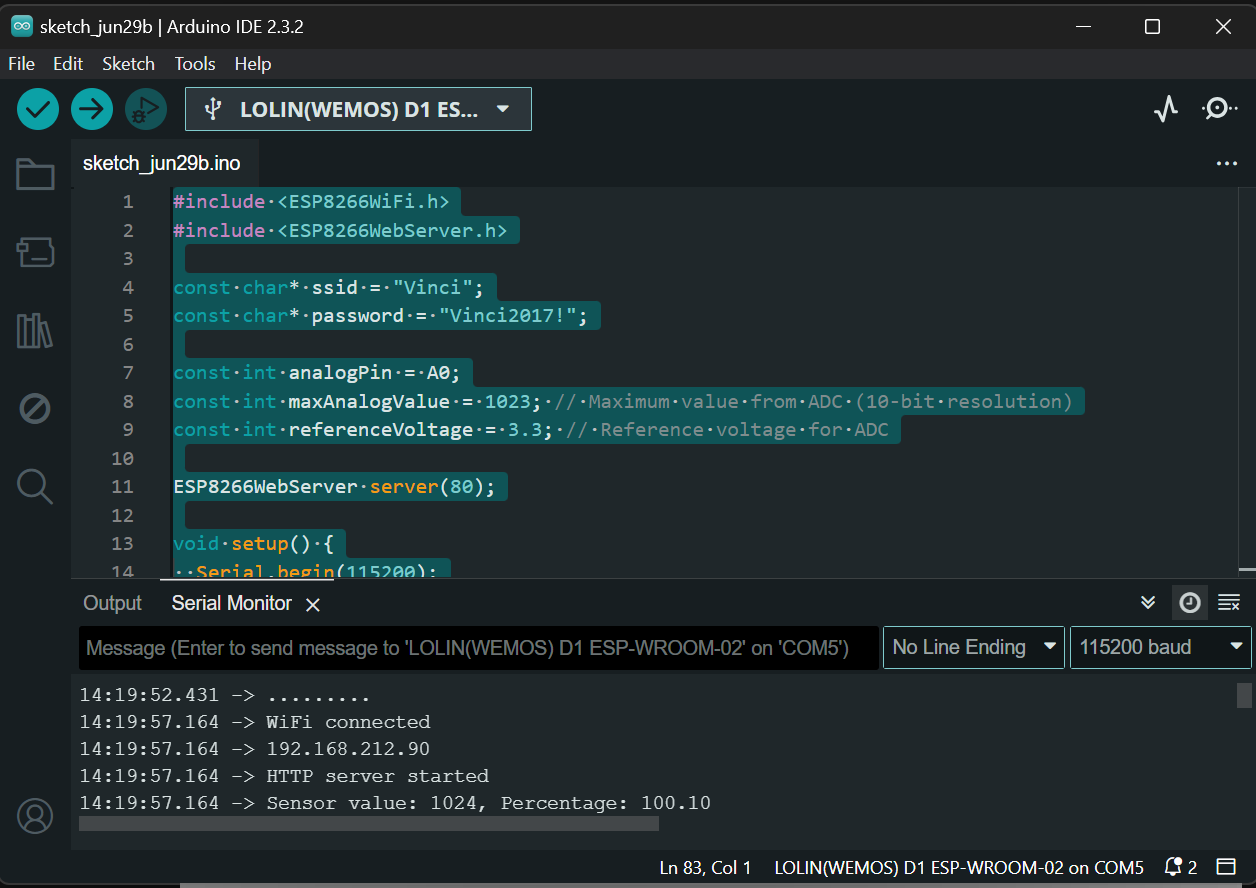
- Copied this IP and opened it in a browser
Final Project - Web Application
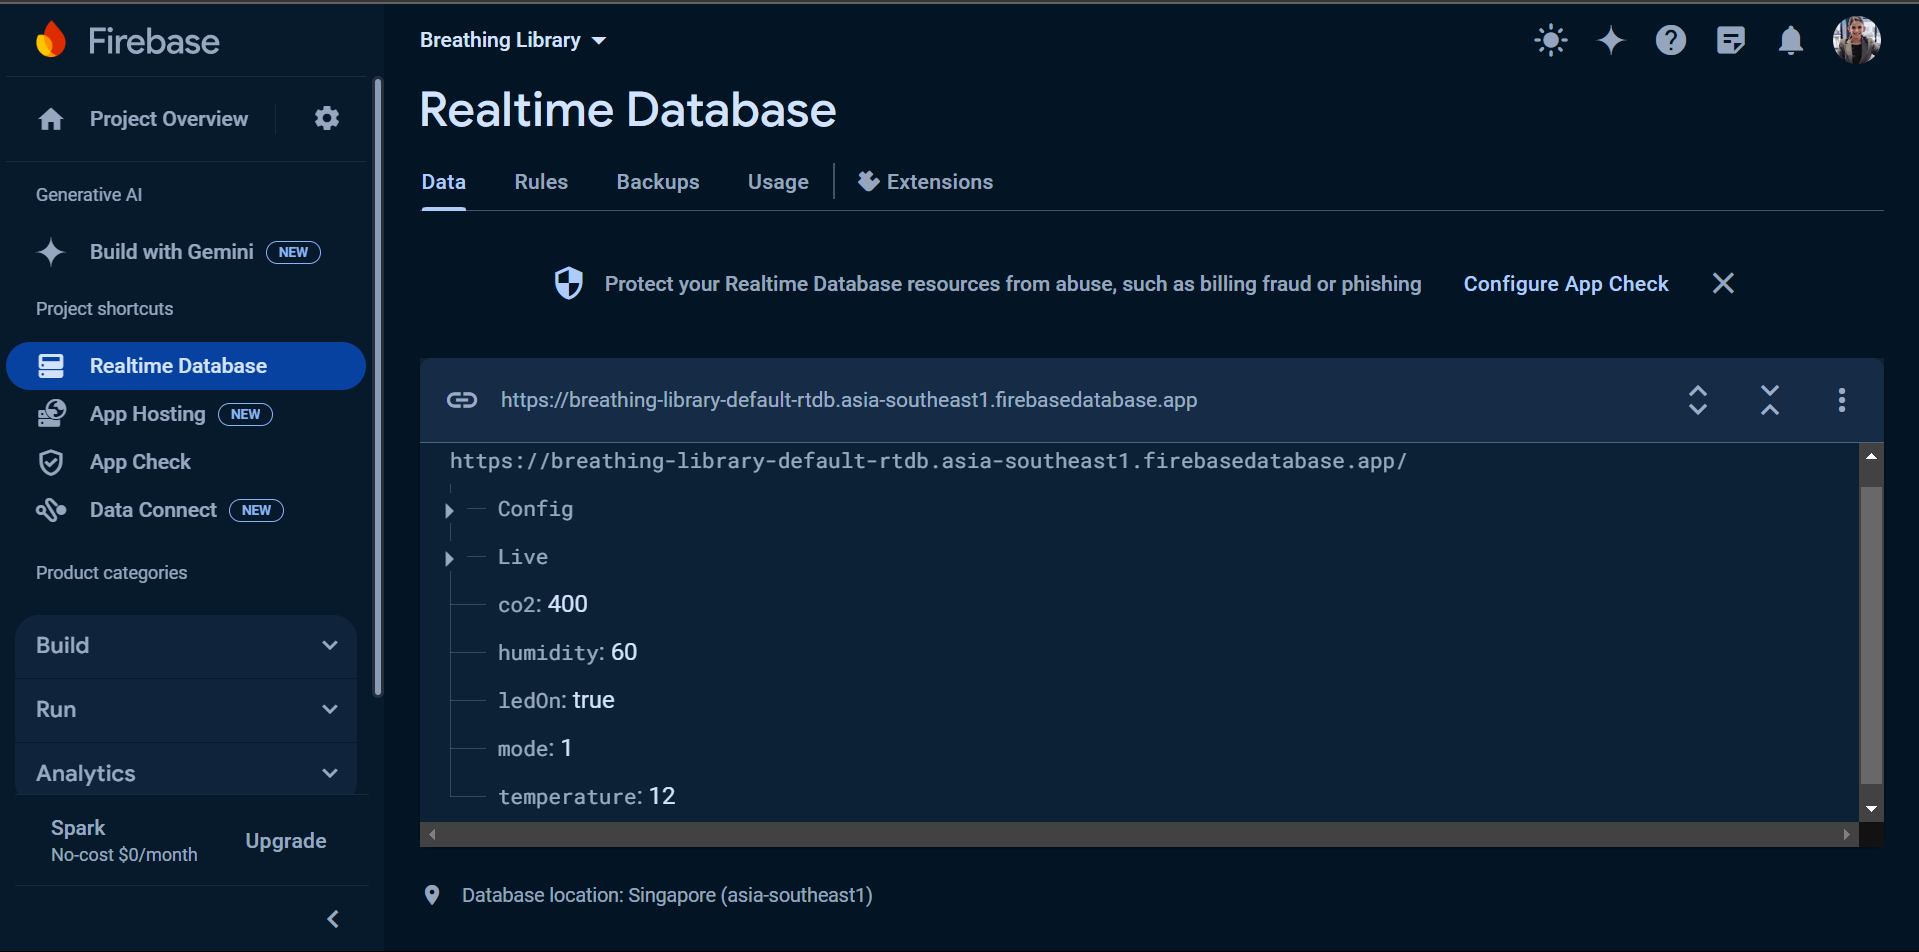
I have explored how to set up and deploy a web application on Firebase to collect and display data from an Arduino device. The setup uses Firebase Realtime Database, an ESP32 microcontroller, and various sensors (MQ135, DHT11, WS2812B).
Prerequisites
- Firebase Account: Ensure you have a Firebase account. If not, create one at Firebase .
- Node.js and npm: Make sure you have Node.js and npm installed. You can download them from Node.js .
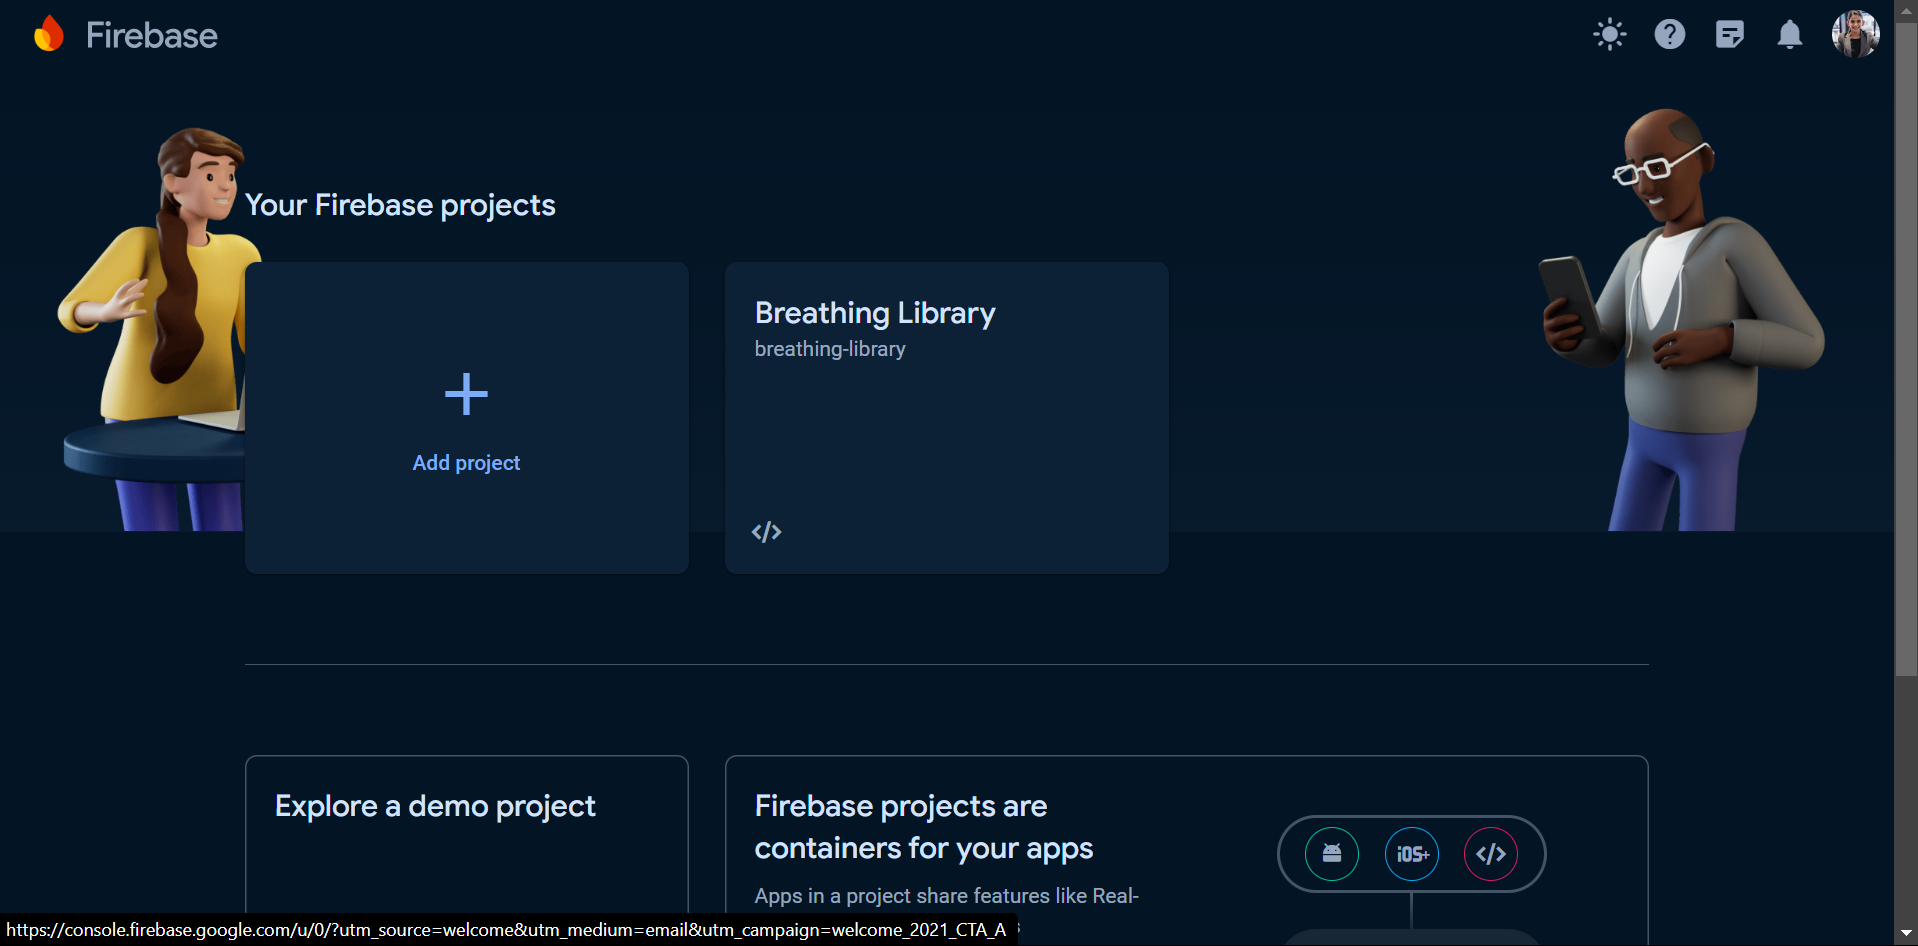
Step 1: Set Up Firebase Project
-
Create a Firebase Project:
- Go to the Firebase Console.
- Click on "Add project" and follow the prompts to create a new project.
-
Enable Firebase Hosting:
- In the Firebase Console, select your project.
- Click on "Hosting" in the left sidebar.
- Click "Get Started" and follow the setup instructions.
Step 2: Initialize Firebase in Your Project
-
Install Firebase Tools:
Open your terminal and install Firebase CLI tools if you haven't already:
bashCopy code
npm install -g firebase-tools
-
Login to Firebase:
bashCopy code
firebase login
-
Initialize Firebase in Your Project:
Navigate to your project directory and run:
bashCopy code firebase init- Select "Hosting" and press Enter.
- Select your Firebase project from the list.
- Choose "public" as the directory for your public files.
- Configure as a single-page app by selecting "Yes".
-
Do not overwrite
index.htmlif prompted.
Step 3: Prepare Your Project Files
-
Project Structure:
Your project directory should have the following files from the extracted zip:
-
.firebaserc
-
firebase.json
-
functions.js
-
index.html
-
main.js
-
style.css
-
package.json
-
-
Project Dependencies:
Install the necessary dependencies by running:
bashCopy code
npm install
-
Firebase Configuration:
Make sure your
firebase.jsonfile looks similar to this:jsonCopy code { "hosting": { "public": "public", "ignore": [ "firebase.json", "**/.*", "**/node_modules/**" ], "rewrites": [ { "source": "**", "destination": "/index.html" } ] } }
Step 4: Write the Arduino Code
-
Arduino Code:
Write the code to read data from the photodiode and send it to Firebase. Example code for ESP8266:
cppCopy code
#include <ESP8266WiFi.h>#include <FirebaseESP8266.h>#define FIREBASE_HOST "your-project-id.firebaseio.com"#define FIREBASE_AUTH "your-database-secret"#define WIFI_SSID "your-ssid"#define WIFI_PASSWORD "your-password"

FirebaseData firebaseData;

void setup() {
  Serial.begin(115200);
  WiFi.begin(WIFI_SSID, WIFI_PASSWORD);
  while (WiFi.status() != WL_CONNECTED) {
    delay(500);
    Serial.print(".");
  }
  Firebase.begin(FIREBASE_HOST, FIREBASE_AUTH);
}

void loop() {
  int sensorValue = analogRead(A0);
  Firebase.setInt(firebaseData, "/sensor/value", sensorValue);
  delay(1000);
}
Step 5: Deploy Your Web Application
-
Build the Application:
If you are using any build tools (like Webpack, Vite, etc.), ensure your files are built and placed in the
publicdirectory.
-
Deploy to Firebase:
Deploy your application by running:
bashCopy code
firebase deploy
-
Access Your Application:
After deployment, you will receive a URL where your application is hosted. You can now access your web application and view the real-time data collected from your Arduino device.
Step 6: Monitor and Maintain
-
Firebase Console:
Use the Firebase Console to monitor your project's real-time database, hosting, and other services.
-
Update and Redeploy:
For any updates or changes, modify your code and redeploy using the
firebase deploycommand.
cppCopy code
// Kavyas-breathing-library.ino
// MQ135 DHT11 WS2812B XIAO_ESP32C3 Firebase Data monitoring
#include <TroykaMQ.h>#include <WiFi.h>#include <FirebaseESP32.h>#include <DHT.h>#include <FastLED.h>#include "time.h"//Firebase config
#define FIREBASE_HOST "https://kavyas-breathing-library-default-rtdb.firebaseio.com/"#define FIREBASE_AUTH "your-api-key"

FirebaseData fbdo;
FirebaseJson json;

String parentPath;
#define DATA_PATH "Live/data/"#define STATUS_PATH "Config/status/"// WiFi Configuration
#define WIFI_SSID "your-ssid"#define WIFI_PASSWORD "your-password"// NTP Server config
const char *ntpServer = "pool.ntp.org";
const long gmtOffset_sec = 5 * 3600 + 30 * 60;  // UTC+5:30

void setup() {
  Serial.begin(115200);
  WiFi.begin(WIFI_SSID, WIFI_PASSWORD);
  while (WiFi.status() != WL_CONNECTED) {
    delay(500);
    Serial.print(".");
  }
  Firebase.begin(FIREBASE_HOST, FIREBASE_AUTH);
  configTime(gmtOffset_sec, 0, ntpServer);
}

void loop() {
  int sensorValue = analogRead(A0);
  Firebase.setInt(fbdo, DATA_PATH + "sensor", sensorValue);
  delay(1000);
}
Step 5: Deploy Web Application
-
Build the Application:
Ensure your files are built and placed in the
publicdirectory.
-
Deploy to Firebase:
bashCopy code
firebase deploy
-
Access the Application:
After deployment, access your application via the provided Firebase Hosting URL.
Step 6: Monitor and Maintain
-
Firebase Console:
Use it to monitor your project's database and hosting.
-
Update and Redeploy:
Modify your code as needed and redeploy using:
bashCopy code
firebase deploy
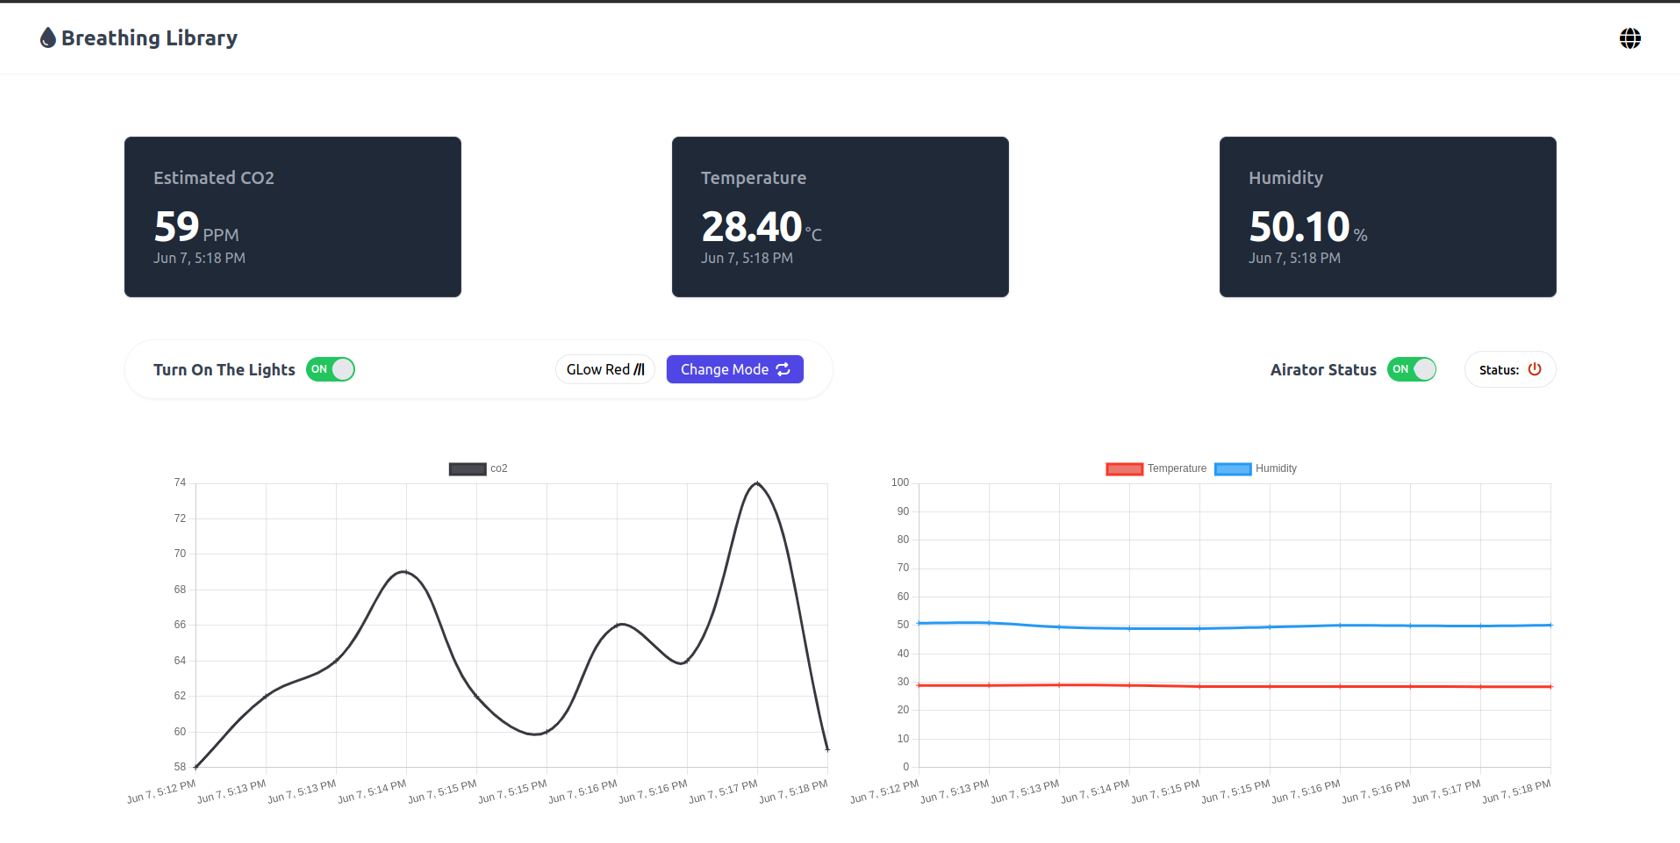
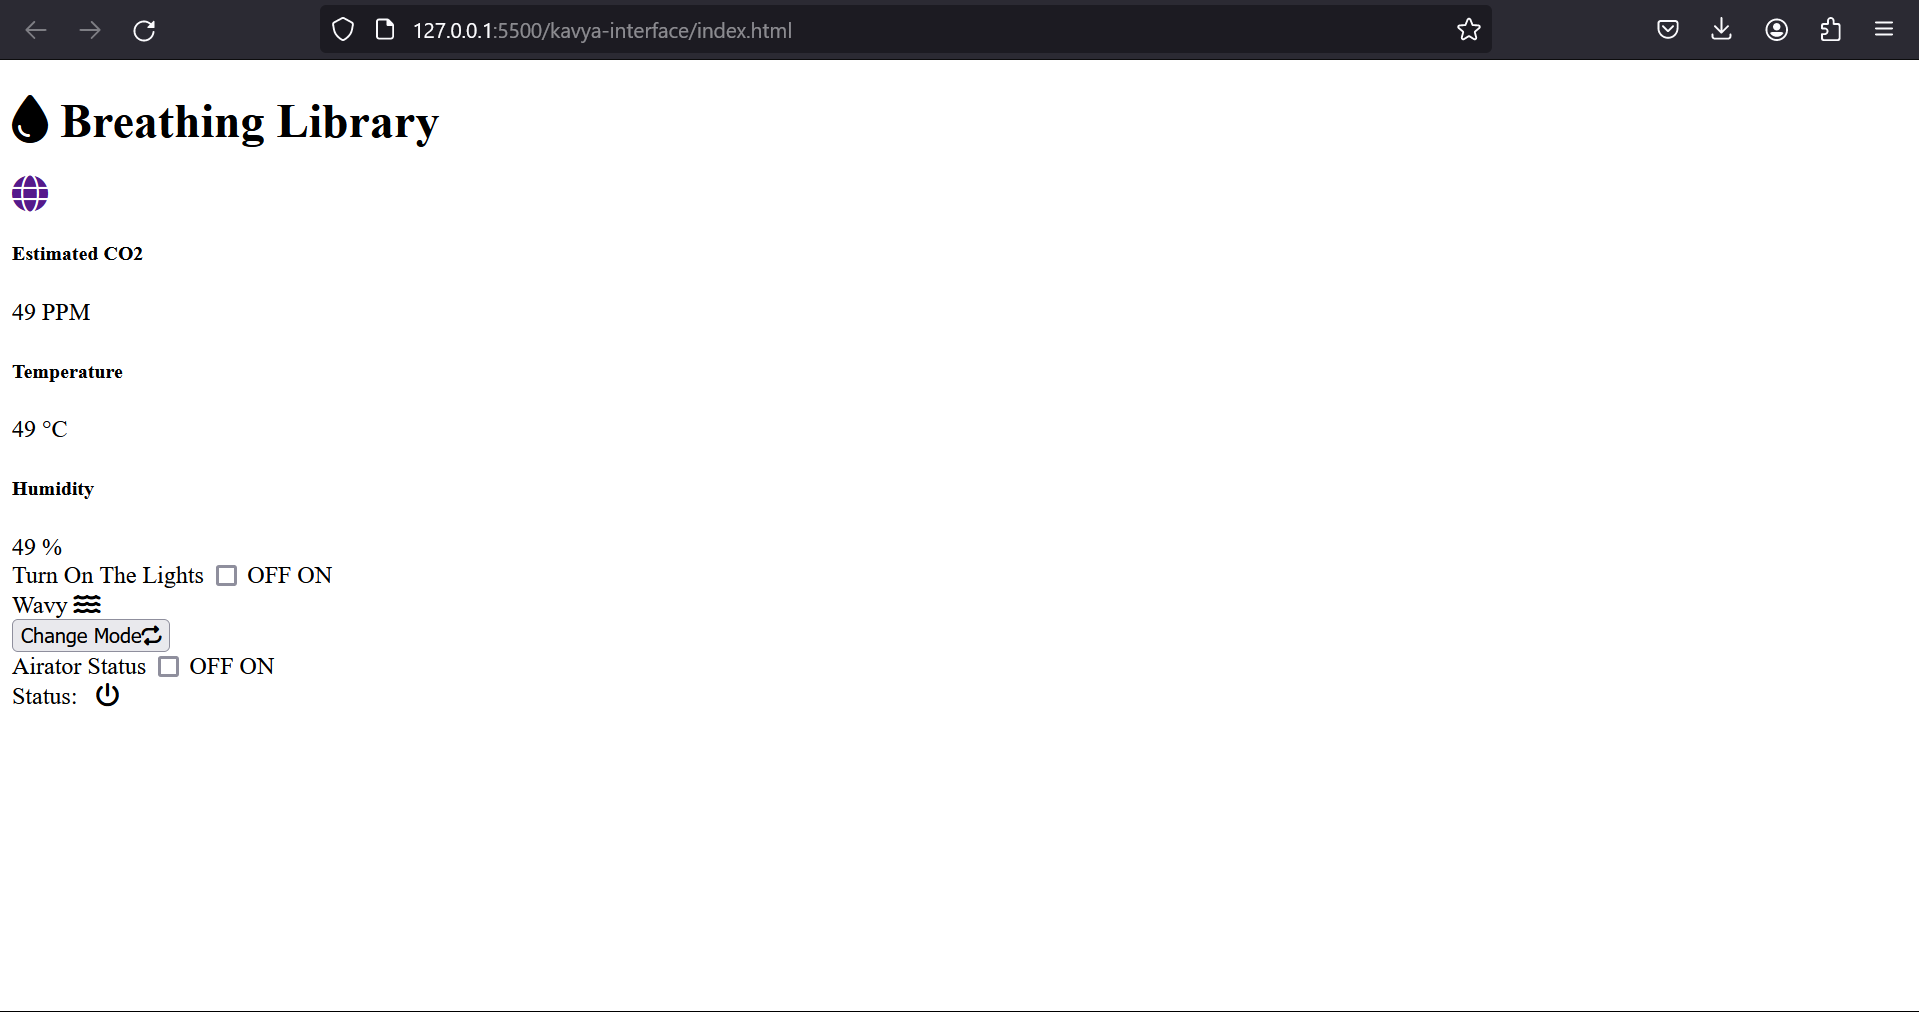
HTML code of my interface UI:
 Output of my Interface: